- Fri 21 February 2020
- Web Apps
- Michael Lehotay
- #DNS, #configuration
Today we're going to set up some DNS resource records for the web apps I built in my data science bootcamp. There are three of them; one is hosted on Digital Ocean and the other two are on Heroku.
- Broccoli Recommender is running at 142.93.153.10
- PokePredictor is running at pokepredictor.herokuapp.com
- Abalone Calculator is running at mollusc.herokuapp.com
I suppose I could buy domains for each one and and give them names like broccoli.com or my-cool-app.xyz but I don't want to pay for three new domain names. I already have a domain and we can give these web apps addresses that are subdomains of the one I already own.
Setting this up on Digital Ocean is a bit easier than on Heroku so let's do the Broccoli Recommender first.
'A' Record for the IP Address
Start by logging into Digital Ocean and clicking on the project in the sidebar. The name of our droplet is displayed along with the IP address where it is running. We need that IP address.

Digital Ocean has DNS tools to manage your domain but we're not going to use them. I'm already using Nearly Free Speech's DNS hosting service and I don't want to switch. The steps should be pretty similar for any DNS hosting provider.
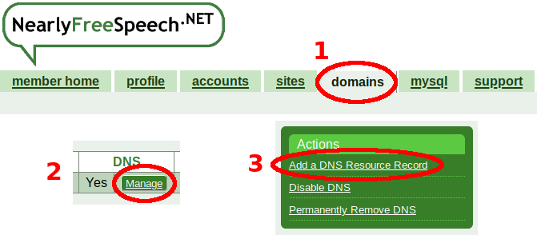
Let's log into my web hosting account and navigate to the DNS Management page.

Since the address we have at Digital Ocean is an IP address we'll need add an A record to the DNS table. If it was a hostname we would add a CNAME record instead. (We'll do that for Heroku next.)


And that's all there is to it! Broccoli Recommender is now accessible at http://broccoli.floatingeye.net!
CNAME Records for the Hostnames
Heroku uses dynamic IP addresses which means that the IP address where a site is hosted can change at any time. The canonical name, however, remains constant. We'll need to set up subdomain aliases for the hostnames that Heroku assigns us.
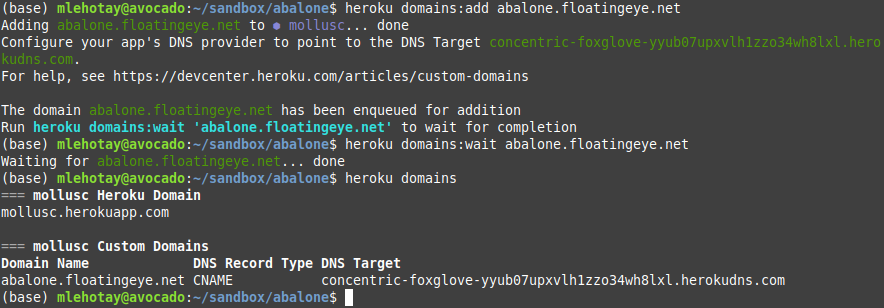
Let's launch a terminal and try to add a new DNS resource through the Heroku command line app.

Ah, yes, of course! The red exclamation marks indicate that the commands failed because my Heroku account isn't validated yet. In order to validate my account I'm going to have to give Heroku a credit card number.
Let's login to my Heroku account, open my account settings, and click on the Billing tab. We can enter our billing info here. The Heroku pricing page says their free accounts do include custom domains, so I don't expect they'll actually charge anything to my card. But if they do I'll update this blog post ;-)

Now let's try the Heroku command line app again.

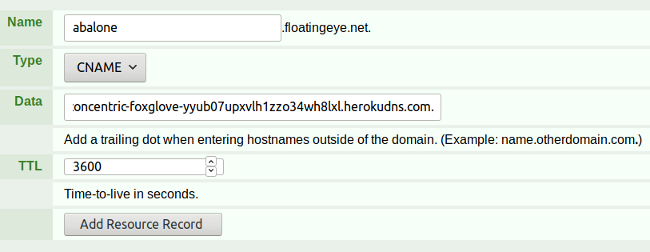
It worked this time! Now we need to go back to our DNS host (Nearly Free Speech) and add a DNS resource record like before, but this time we'll create a CNAME record instead of an A record because we are pointing to a hostname and not an IP address. Notice the period at the end of the URL in the Data field. Some DNS hosting providers require a period at the end if you point to resources outside of your domain.

And now http://abalone.floatingeye.net is live!
Let's do the same thing for http://pokepredictor.floatingeye.net. Don't forget to cd to your project directory first.
